Selecting a reliable soy sauce manufacturer shapes business reputation and product quality. Poor choices expose companies to safety risks and inconsistent supply. Trustworthy partners deliver authentic taste and ensure strict quality control.
Quality, safety, and authenticity remain central to every soy sauce sourcing decision.
Identify Your Soy Sauce Needs

Define Product & Volume Requirements
Every business must first determine the specific type of soy sauce required for its operations. Some companies need large quantities for food manufacturing, while others seek smaller volumes for restaurant use. Accurate volume estimation helps prevent supply shortages and overstock. Companies should also consider whether they need Soy Sauce For Cooking, dipping, or marinating. This clarity ensures the manufacturer can meet ongoing demand and maintain consistent quality.
Clarify Desired Flavor Profiles
Flavor plays a critical role in product selection. Businesses should identify the taste profile that aligns with their cuisine or target market. Authentic Chinese Soy Sauce offers a balance of umami, saltiness, and depth. Pearl River Bridge’s Mushroom Flavoured Superior Dark Soy Sauce provides a unique umami boost with its mushroom extract, making it ideal for those seeking product differentiation. Selecting the right flavor profile enhances the dining experience and supports brand identity.
Tip: Request samples from manufacturers to evaluate aroma, color, and taste before making a decision.
Consider Customization & Private Label
Many manufacturers offer customization options, such as private labeling or tailored formulas. Companies looking to build their own brand can benefit from these services. Natural Fermented Soy Sauce, for example, appeals to health-conscious consumers and can be featured as a premium offering. Pearl River Bridge supports private label solutions, allowing businesses to deliver high-quality products under their own branding. Customization ensures the final product matches both market trends and customer expectations.
Soy Sauce Quality & Safety

Ingredient Sourcing & Brewing Method
Manufacturers must prioritize ingredient quality when producing Soy Sauce. They select premium soybeans, wheat, and water to ensure a consistent flavor and aroma. Many trusted producers use traditional brewing methods, such as fermentation in terracotta vats. This process allows natural elements like air and sunlight to enhance the taste. Natural Fermented Soy Sauce stands out because it relies on time-honored techniques rather than artificial additives. The careful selection of raw materials and adherence to authentic brewing methods guarantee a rich, complex flavor profile. These practices also support health-conscious consumers who seek clean labels and minimal processing.
Certifications & Food Safety Standards
Food safety remains a top concern for businesses sourcing Soy Sauce. Manufacturers must comply with international standards, such as HACCP, ISO, and FDA regulations. Certifications demonstrate a commitment to quality and safety. They assure buyers that the product meets strict hygiene requirements and regulatory guidelines. Companies should request documentation and audit reports to verify compliance. Authentic Chinese Soy Sauce often carries certifications that reflect its heritage and adherence to traditional production standards. Reliable manufacturers maintain transparent records and respond promptly to safety inquiries.
Tip: Always check for visible certification marks on packaging and request detailed safety information from suppliers.
Amino Acid Content & Label Transparency
Amino acid content serves as a key indicator of Soy Sauce quality. High levels of amino acids, especially glutamic acid, contribute to the umami taste that defines premium sauces. Manufacturers should provide clear ingredient lists and nutritional information. Transparent labeling helps buyers identify products with natural ingredients and minimal additives. Simple ingredient lists signal authenticity and quality. Consumers and businesses benefit from knowing exactly what goes into their Soy Sauce For Cooking. This transparency builds trust and supports informed purchasing decisions.
|
Quality & Safety Feature |
Description |
Importance |
|---|---|---|
|
Ingredient Sourcing |
Premium soybeans, wheat, water |
Ensures flavor and purity |
|
Brewing Method |
Traditional fermentation, terracotta vats |
Enhances taste and aroma |
|
Certifications |
HACCP, ISO, FDA compliance |
Guarantees safety |
|
Amino Acid Content |
High glutamic acid, natural fermentation |
Delivers umami flavor |
|
Label Transparency |
Clear ingredient and nutrition info |
Builds consumer trust |
|
Production Capacity |
Scalable operations, consistent output |
Supports business growth |
Production Capacity & Scalability
Production capacity determines whether a manufacturer can meet business demands. Reliable producers invest in scalable operations and advanced technology. They maintain consistent quality across large batches and adapt to changing order volumes. Companies should assess a manufacturer’s ability to deliver on time and handle growth. Large-scale facilities with efficient logistics ensure steady supply and minimize disruptions. Businesses benefit from partnering with manufacturers who offer flexibility and reliability. This approach supports expansion and maintains product standards.
Note: Scalable production and consistent quality are essential for long-term success in the food industry.
Choose the Right Soy Sauce Partner
Reputation & Global Presence
A manufacturer’s reputation stands as a cornerstone for any successful business partnership. Companies should investigate the history and track record of potential partners. A long-standing presence in the industry often signals reliability and expertise. Pearl River Bridge, for example, has built a legacy over six decades, earning trust from clients in more than 150 countries. This global reach demonstrates the ability to meet diverse market needs and adapt to international standards.
Businesses benefit from choosing partners with a proven commitment to quality and authenticity. A reputable manufacturer consistently delivers products that meet expectations for taste, safety, and consistency. When sourcing Authentic Chinese Soy Sauce, companies should look for brands recognized for their heritage and dedication to traditional methods. Pearl River Bridge’s Mushroom Flavoured Superior Dark Soy Sauce showcases this commitment through its meticulous fermentation process and use of premium ingredients. Such attributes help businesses build consumer confidence and strengthen their own brand reputation.
Tip: Research industry awards, customer testimonials, and export records to verify a manufacturer’s standing in the global market.
Communication & Transparency
Effective communication forms the backbone of any strong business relationship. Manufacturers must provide clear, timely information about product specifications, order status, and delivery schedules. Transparent partners share details about ingredient sourcing, production methods, and quality control measures. This openness allows companies to make informed decisions and respond quickly to market changes.
Pearl River Bridge exemplifies transparency by offering detailed product information and supporting documentation. Businesses can request data on certifications, food safety standards, and production processes. This level of openness ensures that clients receive Natural Fermented Soy Sauce and Soy Sauce For Cooking that align with regulatory requirements and consumer expectations. Reliable partners also maintain responsive customer service teams, addressing inquiries and resolving issues promptly.
A transparent manufacturer builds trust by providing accurate labeling and clear nutritional information. Companies should prioritize partners who value honesty and accountability at every stage of production and distribution. This approach reduces risks and fosters long-term collaboration.
-
Evaluate the manufacturer’s responsiveness to questions.
-
Request documentation on food safety and ingredient sourcing.
-
Monitor consistency in communication throughout the partnership.
Note: Strong communication and transparency not only protect your business but also enhance your ability to deliver high-quality Soy Sauce to your customers.
Selecting a reliable soy sauce manufacturer requires clear product needs, a focus on quality, and strong communication. Companies should verify certifications and production standards. By following these steps, businesses can secure Authentic Chinese Soy Sauce, Natural Fermented Soy Sauce, or Soy Sauce For Cooking that aligns with their goals and quality expectations.
FAQ
What certifications should a reliable soy sauce manufacturer have?
Manufacturers should hold certifications like HACCP, ISO, or FDA. These credentials confirm food safety, quality control, and compliance with international standards for Authentic Chinese Soy Sauce.
How does brewing method affect soy sauce quality?
Traditional brewing, such as natural fermentation, enhances flavor and aroma. Natural Fermented Soy Sauce delivers richer taste and higher amino acid content, making it ideal for Soy Sauce For Cooking.
Can manufacturers provide private label or custom soy sauce solutions?
Many manufacturers offer private label and customization services. These options help businesses create unique products, including specialized Soy Sauce For Cooking or Authentic Chinese Soy Sauce blends.
You can reduce food costs in your Asian restaurant without sacrificing authentic flavor. Food expenses often account for 28%–32% of total operating costs, making cost control essential. Consistent taste and supply stability help you maintain quality and customer satisfaction. Common challenges include balancing authenticity with scalability and sourcing regional ingredients. By optimizing your menu, standardizing portions, partnering with a reliable restaurant sauce supplier, and improving inventory management, you protect your margins while keeping dishes true to tradition.
Tip: Focus on practical strategies that maintain flavor and ensure stable supply.
|
Cost Category |
Percentage of Total Costs |
|---|---|
|
Food Costs |
28% - 32% |
|
Labor Costs |
25% - 30% |
|
Occupancy Costs |
8% - 12% |
|
Marketing and Advertising |
2% - 5% |
|
Miscellaneous |
2% - 5% |
|
Profit |
10% - 15% |
Key Takeaways
-
Optimize your menu by analyzing sales data to identify high-cost and low-performing dishes.
-
Cross-utilize ingredients across multiple dishes to reduce waste and simplify inventory management.
-
Implement portion control by training staff on standard serving sizes to maintain consistency and reduce costs.
-
Build strong relationships with suppliers to negotiate better pricing and ensure a stable supply of quality ingredients.
-
Use technology like inventory software to track stock levels and make data-driven purchasing decisions.
-
Encourage staff engagement by sharing cost control goals and rewarding waste reduction efforts.
-
Test recipes regularly to ensure flavor remains consistent while making cost-saving adjustments.
-
Monitor customer feedback and online reviews to maintain satisfaction and address any concerns promptly.
Menu Optimization

Optimizing your menu is a powerful way to reduce food costs while preserving the authentic flavors your customers expect. You can use data-driven strategies and ingredient streamlining to boost profitability and efficiency.
Menu Analysis
Identify High-Cost Dishes
Start by reviewing your menu to pinpoint dishes that drive up food costs. Focus on items with expensive ingredients or complex preparation. You can improve margins by mastering simple dishes and highlighting those that use cost-effective proteins or vegetables. For example, grilled chicken salads and rich stocks from bones often deliver high profit margins.
Tip: Execute simple dishes well to maximize profitability and maintain quality.
Use Sales Data
Analyze your sales data to understand which dishes sell best and which ones lag behind. Use this information to adjust your menu, promote popular items, and phase out low-performing dishes.
-
Menu engineering helps you control costs and streamline selections.
-
Upselling opportunities arise when you identify premium dishes that can be paired with lower-profit items.
-
Data-driven decisions ensure your menu reflects customer preferences and cost performance.
Ingredient Streamlining
Cross-Utilize Ingredients
Choose ingredients that work across multiple dishes. Cross-utilization reduces waste and simplifies inventory management. For instance, you can use chicken trim pieces in salads, soups, or stir-fries.
-
Cross-utilization increases efficiency and lowers food costs.
-
Labor efficiency improves when staff can prepare dishes quickly using familiar ingredients.
Simplify Recipes
Simplify recipes to minimize the number of ingredients and steps required. Standardizing recipes ensures consistency in taste and cost.
-
Standardization prevents excessive ingredient use.
-
Portion control measures help match food served with menu pricing.
-
Training staff on recipe adherence is crucial for realizing these benefits.
Profitable Specials
Use Seasonal Ingredients
Design specials around seasonal and local ingredients. Seasonal produce often costs less and delivers fresher flavors.
-
Adapt your menu to ingredient availability for cost savings.
-
Seasonal specials attract customers and provide a competitive advantage.
Note: Menu optimization supports continuous improvement. Track menu performance and adjust based on demand to enhance profitability.
By focusing on menu analysis, ingredient streamlining, and profitable specials, you create a menu that delights customers and protects your bottom line. Use these strategies to ensure your Asian restaurant stands out in a crowded market.
Portion Control
Consistent portion control forms the backbone of effective food cost management in Asian restaurants. You can maintain profitability and deliver a reliable dining experience by ensuring every dish meets a set standard. Portion consistency not only helps you control expenses but also builds trust with your customers, who expect the same quality and quantity each visit.
Standardize Servings
Staff Training
Train your kitchen staff to follow precise serving guidelines for every menu item. Use visual aids, such as plating photos or diagrams, to show the correct portion size. Conduct regular workshops to reinforce these standards. When your team understands the importance of consistency, you reduce food cost variance and improve customer satisfaction. Implementing portion control ensures that each dish contains a consistent amount of ingredients, which directly addresses food cost variance. This practice not only helps in managing expenses but also enhances customer satisfaction by providing a reliable dining experience.
Use Measuring Tools
Equip your kitchen with reliable measuring tools. Use portion scoops, digital scales, and ladles to ensure accuracy. Label containers for pre-portioned ingredients. These tools help your staff serve the right amount every time, reducing over-portioning and minimizing waste. Consistent use of measuring tools also speeds up service and simplifies training for new employees.
Tip: Create a portion control chart for your kitchen. Display it in a visible area to remind staff of standard serving sizes.
Monitor Plate Waste
Adjust Portions
Observe how much food returns to the kitchen uneaten. Track plate waste for each dish over several days. If you notice frequent leftovers, consider reducing portion sizes. Adjusting portions based on actual consumption helps you cut costs without disappointing customers. You can also use customer feedback to fine-tune serving sizes. When you align portions with customer preferences, you avoid unnecessary waste and improve satisfaction.
Value Perception
Customers judge value by more than just portion size. They want to feel they are getting a fair deal for their money. Consider these real customer perspectives:
-
One diner said, "I would like the different options. I just don’t want less food for more money."
-
Another guest shared, "The portion sizes are important to me, but I also look for the value. If the full-sized portion is a better value that’ll give you two or three meals, I’ll do that then."
-
A customer observed, "I think with Chinese food it’s like a huge dish, so it’s hard to use self-control."
-
Someone else noted, "We had enough leftovers for at least one to two more meals."
You can offer multiple portion sizes or family-style options to address these concerns. Highlight the value of your dishes by emphasizing quality ingredients, authentic flavors, and the potential for leftovers. When customers perceive value, they remain satisfied even if you adjust portion sizes for cost control.
Remember: Portion control is not about giving less. It is about delivering consistent value and a memorable dining experience every time.
Smart Sourcing & Restaurant Sauce Supplier
Smart sourcing forms the backbone of cost control and flavor consistency in your Asian restaurant. You can achieve stable supply, authentic taste, and better margins by building strong relationships with your suppliers and making strategic purchasing decisions.
Supplier Partnerships
Negotiate Terms
You should develop long-term partnerships with your restaurant sauce supplier. These relationships allow you to negotiate better pricing, secure priority during shortages, and lock in quality standards. When you work closely with a restaurant sauce supplier, you gain access to exclusive deals and early information about new products. This approach helps you plan ahead and avoid last-minute price spikes.
Ensure Supply Stability
A reliable restaurant sauce supplier ensures you never run out of essential ingredients. Consistent deliveries keep your kitchen running smoothly and your menu flavors true to tradition. The table below highlights the benefits of strong supplier partnerships:
|
Benefit |
Description |
|---|---|
|
Cost Savings |
Bulk purchasing leads to financial benefits without compromising quality. |
|
Ingredient Authenticity |
Sourcing from authentic suppliers ensures flavors remain true to tradition. |
|
Consistency |
Reliable suppliers provide consistent quality, essential for maintaining customer satisfaction. |
|
Reliable Service |
A dependable partner ensures timely delivery of fresh ingredients, crucial for restaurant operations. |
Bulk Buying
Work with Bulk Seasoning Supplier
Bulk buying from a bulk seasoning supplier can lower your ingredient costs and simplify inventory management. You can take advantage of tiered pricing, where larger orders mean bigger discounts. For example:
-
Purchasing in larger quantities lowers the cost per unit, helping you maximize your budget while preserving flavor.
-
Many suppliers offer discounts, such as 10% off at $200 or 15% off at $500, making it easier to plan for busy periods.
You can also explore products like Soy Sauce Powder, which offer long shelf life and consistent taste in every batch. This approach reduces the risk of running out of key seasonings and helps you maintain menu quality.
Seasonal & Local Sourcing
Adapt Menu to Availability
You can further reduce costs and enhance freshness by sourcing seasonal and local ingredients. Adjust your menu to highlight what is available locally. This strategy supports local farmers and introduces unique flavors to your dishes. Consider the following advantages and challenges:
|
Advantages of Local Sourcing |
Challenges of Local Sourcing |
|---|---|
|
Fresher, better-tasting ingredients |
Irregular supply |
|
Reduced carbon footprint |
Food safety issues |
|
Support for local economies |
Need for local producers to meet quality standards |
|
Unique culinary experiences that attract tourists |
Inconsistent product labeling and packaging |
You can work with your restaurant sauce supplier to identify local alternatives for key sauces and condiments. This flexibility keeps your menu exciting and your costs under control.
Tip: Regularly review your supplier agreements and inventory needs. Strong supplier relationships and smart sourcing decisions help you deliver authentic flavors while protecting your bottom line.
Waste Reduction
Effective waste reduction starts with strong inventory management and smart storage. You can protect your margins and maintain quality by following proven methods that minimize spoilage and maximize ingredient use.
Inventory Management
FIFO Method
You should always use the First-In-First-Out (FIFO) method. Place newer stock behind older items so your team uses the oldest ingredients first. This simple step reduces spoilage and keeps your kitchen running smoothly. FIFO works best when you label all products with delivery dates and train staff to rotate stock during every shift.
Regular Tracking
Track your inventory regularly to spot trends and prevent over-ordering. Conduct weekly inventory counts and compare them to sales data. This practice helps you identify which items move quickly and which ones sit unused. Set par levels for each ingredient to avoid excess stock. Use inventory software for real-time tracking and to alert you when supplies run low. Strong vendor relationships also help you adjust orders quickly if demand changes.
Tip: Standardize recipes and portions to ensure consistent ingredient usage. This step makes tracking easier and reduces unexpected waste.
Key Inventory Management Steps:
-
Implement FIFO for all perishable goods.
-
Count inventory weekly and monitor usage patterns.
-
Set par levels to avoid overstocking.
-
Use technology for real-time inventory updates.
-
Build strong relationships with suppliers for flexible ordering.
-
Standardize recipes and portions across your menu.
-
Monitor food cost percentage every week.
-
Cross-utilize ingredients in multiple dishes.
-
Track and analyze waste to find problem areas.
-
Adjust your menu based on inventory and sales data.
Storage Techniques
Vacuum Sealing
Vacuum sealing extends the shelf life of meats, seafood, and prepared sauces. You can store ingredients longer without losing quality or flavor. This method also prevents freezer burn and reduces the risk of contamination. Invest in a reliable vacuum sealer and train your staff to use it for bulk proteins, prepped vegetables, and house-made sauces. Proper storage keeps your ingredients fresh and your costs under control.
Creative Leftover Use
Stocks & Side Dishes
Transform leftovers into new menu items to reduce waste and boost profits. Use vegetable trimmings and bones to create rich stocks for soups or sauces. Repurpose cooked rice into fried rice specials or turn extra proteins into lunch bento boxes. You can also offer daily side dishes that feature surplus produce. This approach not only cuts waste but also adds variety to your menu.
Note: Encourage your kitchen team to suggest creative ways to use leftovers. Staff engagement leads to more ideas and less waste.
By mastering inventory management, using advanced storage techniques, and finding new uses for leftovers, you can significantly reduce food waste in your Asian restaurant. These steps help you save money, protect flavor, and support a more sustainable operation.
Staff Training & Engagement
Your staff plays a critical role in controlling food costs and maintaining consistent quality. You can empower your team to support your restaurant’s goals by sharing clear objectives, offering incentives, and providing ongoing training.
Cost Awareness
Share Goals
You should start by making cost control goals visible and understandable. When you share your targets for food cost percentage and waste reduction, your staff sees how their actions impact the restaurant’s success. Use staff meetings to explain how careful portioning, proper storage, and minimizing waste contribute to profitability. Display charts or progress boards in the kitchen to track performance.
Tip: Celebrate milestones together. Recognition builds motivation and teamwork.
Incentives
Reward Waste Reduction
Motivating your staff with incentives encourages responsible behavior and reduces waste. You can implement reward programs that recognize individuals or teams who achieve waste reduction targets. Consider these proven approaches:
-
Hangzhou restaurants use a 'White and Black List' system to highlight responsible staff and broadcast anti-food waste messages.
-
Shenzhen canteens analyze data to minimize ingredient waste and promote food donations. They also enforce rules against excessive ordering.
You can adapt these strategies by offering bonuses, extra time off, or public recognition for staff who consistently follow portion guidelines and suggest creative ways to use leftovers.
Note: Incentives work best when you combine them with clear communication and regular feedback.
Ongoing Training
Continuous training ensures your staff understands the importance of their role in cost management and quality control. You should educate employees about the financial impact of food costs. Training on proper storage, handling, and portioning helps your team prepare dishes consistently and reduces waste. Supervision and accountability minimize pilferage and protect your margins.
-
Teach staff how to store ingredients correctly to extend shelf life.
-
Train employees to measure portions accurately for every dish.
-
Hold regular workshops to reinforce best practices and update procedures.
You can use checklists and supervision to maintain standards. When you invest in ongoing training, you build a culture of responsibility and excellence.
Tip: Encourage staff to share feedback and suggest improvements. Engagement leads to innovation and better results.
By focusing on cost awareness, incentives, and ongoing training, you create a team that supports your restaurant’s financial health and delivers consistent, high-quality dishes. Staff engagement is essential for sustainable cost control and customer satisfaction.
Technology for Cost Control
Embracing technology can transform how you manage food costs in your Asian restaurant. Modern tools help you track inventory, make smarter purchasing decisions, and integrate your point-of-sale (POS) system for seamless operations. By using the right technology, you gain real-time insights, reduce waste, and protect your margins.
Inventory Software
Inventory software gives you control over your stock and costs. You can monitor ingredient levels, track usage, and spot trends before they become problems. Many solutions offer mobile apps, recipe costing, and smart ordering features. These tools help you identify profitable dishes and forecast demand.
|
Feature |
Description |
|---|---|
|
Mobile App |
Faster ordering and easier tracking with a mobile application. |
|
Recipe Costing |
Breaks down ingredient costs for menu items, identifying profitable dishes. |
|
Smart Ordering |
Uses predictive analytics to forecast demand and minimize food waste. |
|
Real-Time Updates |
Provides live updates on inventory costing and food cost transparency. |
|
Integrations |
Seamless integration with major POS platforms and accounting software. |
|
Case Studies |
Demonstrates effectiveness in reducing costs and improving profitability for various restaurants. |
You can see results quickly. For example, some restaurants have streamlined inventory management and reduced cost of goods by 3%. Others have gained inventory visibility and reduced food waste, which improves profitability.
Real-Time Tracking
Real-time tracking lets you know exactly what you have in stock at any moment. You avoid over-ordering and prevent running out of key ingredients during busy periods. With live updates, you can react to changes in demand and adjust your orders instantly. This approach keeps your kitchen efficient and your costs under control.
Data-Driven Decisions
Data-driven decision-making tools help you optimize purchasing and reduce food costs. These platforms compare prices across multiple suppliers and integrate with commodity market data to predict price trends. You can time your purchases when prices are low and avoid costly mistakes.
|
Evidence Description |
Impact on Purchasing and Food Costs |
|---|---|
|
Compare prices across suppliers |
Identifies opportunities to reduce costs without compromising quality standards. |
|
Integrate with commodity market data |
Helps you time large purchases when prices are favorable. |
|
Track every ingredient leaving the kitchen |
Provides real-time visibility into margins on every dish. |
|
Analyze sales history and trends |
Enables data-driven decisions on ingredient ordering and prevents stock shortages. |
Adjust Purchasing
You can use these insights to adjust your purchasing strategy. For example, smart forecasting technology analyzes your sales history and predicts future demand. This helps you order the right amount of ingredients, reducing waste and preventing shortages. You maintain consistent quality while keeping costs in check.
POS Integration
Integrating your POS system with inventory management brings even more control. You track stock levels in real time, receive automated alerts when it is time to reorder, and minimize overstocking. This integration reduces order errors and speeds up service, as staff can send tickets directly to the kitchen.
|
Benefit |
Description |
|---|---|
|
Real-time tracking |
Helps monitor stock levels to avoid running out during busy periods. |
|
Automated alerts |
Notifies when it's time to reorder, preventing last-minute shortages. |
|
Reduced waste |
Efficient stock management minimizes overstocking and spoilage. |
-
Ingredient-level tracking
-
Automatic stock deduction
-
Purchase order management
-
Central warehouse integration
-
Low-stock alerts
Adopting technology such as AI, IoT, and machine learning can further enhance efficiency. These tools help you predict meal demand, optimize inventory, and create personalized customer experiences. As a result, you reduce food waste, improve service, and lower your overall food costs.
Tip: Start with one technology upgrade, such as inventory software or POS integration. You will see immediate benefits in cost control and operational efficiency.
Maintaining Flavor & Satisfaction
Cost-saving strategies only succeed when you maintain the authentic flavors and satisfaction your guests expect. You can achieve this balance by testing recipes, choosing quality ingredients, and actively monitoring guest feedback.
Recipe Testing
Regular recipe testing helps you ensure that any changes in ingredients or preparation methods do not compromise the taste of your dishes. Involve your kitchen team in tasting sessions whenever you adjust a recipe for cost efficiency. Invite trusted customers to sample new versions and provide honest feedback.
“I do not sacrifice taste just for the sake of reducing calories (or following a trend). My healthy recipes are accidentally healthy.”
You can streamline recipes or use shortcuts, but only if they do not affect flavor. For example:
-
Use time-saving techniques that preserve the dish’s signature taste.
-
Replace expensive ingredients with alternatives that deliver the same depth of flavor.
-
Test every change to confirm it meets your standards.
You want to create vibrant, cost-effective recipes that impress guests and keep them coming back.
Staff & Customer Feedback
Encourage your staff to share their opinions during recipe trials. Their daily experience gives valuable insight into what works in your kitchen. You can also gather feedback from regular customers through surveys or informal conversations. This approach helps you identify which changes enhance the dining experience and which ones need further adjustment.
Quality Ingredients
Investing in high-quality ingredients remains essential, even as you look for savings. Premium ingredients help you retain flavor and deliver a consistent experience.
-
Premium ingredients lead to better flavor retention and consistent experience.
-
Higher guest satisfaction results in repeat business, which drives long-term revenue.
-
A 10% increase in repeat customer probability can triple a guest's lifetime value.
You can use portion control and menu engineering to maximize the impact of quality ingredients without increasing costs. Seasonal sourcing also allows you to offer fresher dishes at lower prices.
Positive Marketing
Highlight your commitment to quality in your marketing materials. Share stories about your ingredient sourcing and recipe development. When guests know you prioritize flavor and authenticity, they feel more confident in your menu—even as you make cost-saving adjustments.
Monitor Reviews
Online reviews provide real-time insight into how guests perceive your food and service. Use reputation management tools to track feedback across platforms. These systems help you identify trends and respond quickly to concerns.
-
Real-time feedback tools help staff resolve issues and maintain satisfaction.
-
Centralized reputation management lets you monitor and respond to reviews efficiently.
-
AI-powered responses and automated alerts enable prompt action on guest concerns.
-
Sentiment analysis reveals deeper insights into guest experiences.
By actively monitoring reviews, you can address problems before they affect your reputation. This proactive approach ensures your cost-saving measures never come at the expense of flavor or guest satisfaction.
You can reduce food costs and maintain authentic flavor by focusing on practical steps. Start by standardizing recipes to ensure consistent taste and control ingredient use. Implement portion control to prevent waste and manage expenses. Track inventory closely to minimize losses. These strategies work together to protect your margins and keep your menu true to tradition. Begin with one or two changes, such as reviewing your menu or supplier relationships. Consistent taste, cost control, and supply stability are within your reach.
FAQ
How can I reduce food costs without lowering quality?
You can standardize recipes, control portions, and source ingredients from reliable suppliers. Use inventory tracking to minimize waste. Test new recipes with your team to ensure flavor stays consistent.
What is the best way to choose a restaurant sauce supplier?
Look for suppliers with a strong reputation, stable supply, and consistent quality. Negotiate pricing and delivery terms. Ask for samples to test flavor and compatibility with your menu.
How does portion control help my restaurant?
Portion control ensures every dish uses the right amount of ingredients. You reduce waste, manage costs, and deliver a consistent experience to your guests. Use measuring tools and staff training for best results.
Can I use bulk seasoning suppliers for all ingredients?
You can use bulk seasoning suppliers for many staples like Soy Sauce Powder, dried spices, and sauces. Always check quality and shelf life. Store bulk items properly to maintain freshness.
What technology should I use for inventory management?
Choose inventory software that offers real-time tracking, recipe costing, and POS integration. These features help you monitor stock, reduce waste, and make smarter purchasing decisions.
How do I keep authentic flavors when cutting costs?
Test recipes with alternative ingredients. Use high-quality seasonings and sauces. Involve your staff in taste tests. Gather customer feedback to ensure dishes still meet expectations.
How often should I review my menu for cost savings?
Review your menu every quarter. Analyze sales data, ingredient costs, and customer feedback. Adjust dishes or portions as needed to maximize profit and maintain quality.
What should I do with leftover ingredients?
Repurpose leftovers into soups, stocks, or daily specials. Track leftover trends to adjust ordering. Encourage your kitchen team to suggest creative uses for surplus items.
You can experience a new way to enjoy soy sauce with solidified soy sauce. This innovative product gives you a rich, enhanced flavor in a modern, easy-to-use form. You will find it convenient whether you cook at home or work as a professional chef. Many people choose it for its cost savings, versatility, and premium quality.
Key Takeaways
- Solidified soy sauce offers a concentrated flavor, allowing you to use less while enhancing your dishes.
- The production process preserves the natural taste and nutrition of soybeans, ensuring high quality and safety.
- This innovative product is easy to store and transport, making it a convenient choice for both home cooks and professional chefs.
- You can reconstitute solidified soy sauce with water, giving you control over the flavor strength in your recipes.
- Using solidified soy sauce can save you money and space, making it a cost-effective option for cooking.
Solidified Soy Sauce: Unique Form and Composition

Production Process
You can discover how solidified soy sauce is made by looking at each step in the process. This method preserves the nutrition and flavor of every soybean. Pearl River Bridge uses a careful approach to ensure high quality. Here is how the production works:
- Ingredient Preparation: You start with soybeans, wheat, and salt. Each ingredient adds to the final taste and texture.
- Cooking: The soybeans and wheat are steamed or roasted. This step softens them and gets them ready for mixing.
- Mixing and Cooling: After cooking, you mix the ingredients and cool them to about 86°F (30°C). Koji spores are added to help break down starches and proteins.
- Fermentation or Hydrolysis: You can use traditional fermentation, which takes over 100 days and creates deep flavors. Some producers use a faster chemical process called acid hydrolysis, but Pearl River Bridge focuses on natural fermentation for a richer taste.
- Solidification: Water is removed from the liquid soy sauce. This step makes the product easier to store and boosts the flavor.
- Drying: Spray drying or freeze drying turns the liquid into a powder or block.
- Packaging: The final solidified soy sauce is packaged to keep it fresh and ready for use.
You will also find that solidified soy sauce production uses modern technology. Patented methods help keep the natural taste and aroma. Some techniques focus on making light-colored, low-odor soy sauce with strong umami flavors. These methods use natural fermentation and avoid artificial ingredients. Producers also use special enzymes to boost umami compounds, making the taste even better.
Food safety is very important. Manufacturers follow strict standards and certifications to protect your health. Here is a table of common certifications:
| Certification | Description |
| ISO 22000 | International standard for food safety management systems |
| HACCP | Preventive approach to food safety |
| FDA Registration | Needed for exporting to the United States |
| BRC | Global food safety standard |
| HALAL | For products allowed under Islamic law |
| Kosher | For products allowed under Jewish dietary law |
| Non-GMO Project Verified | Ensures no genetically modified organisms |
| GFSI recognized | High level of food safety assurance (e.g., FSSC 22000) |
Packaging also matters. Oxygen-impermeable bottles help keep the flavor and extend shelf life.
Texture and Structure
When you use solidified soy sauce, you notice a big difference from regular liquid soy sauce. The texture and structure set it apart:
- Solidified soy sauce comes as a dense paste or in small granules. Liquid soy sauce is mostly water.
- The flavor is much stronger in the solid form. You need less to get the same taste.
- The low moisture content makes it stable and less likely to spoil. Liquid soy sauce can go bad faster.
- The solid form is easy to store and transport. It does not spill or leak.
You can also compare the composition of different types of soy sauce. Here is a table that shows the main differences between dark and light soy sauces:
| Feature | Dark Soy Sauce | Light Soy Sauce |
| Composition | Added sweeteners like molasses or caramel | No added sweeteners, thinner consistency |
| Viscosity | Thicker | Thinner, more fluid |
| Flavor Profile | Milder salty, caramelized sweetness | Sharper saltiness, enhances umami |
| Color | Deep reddish-brown | Lighter amber |
| Culinary Use | Glazing, red-cooked dishes | Seasoning, marinades |
| Interchangeability | Not interchangeable with light soy sauce | Not interchangeable with dark soy sauce |
Solidified soy sauce stands out because it gives you a concentrated, stable, and easy-to-use product. You get all the benefits of traditional soy sauce in a modern form that fits your busy kitchen.
Distinct Flavor and Aroma
Flavor Intensity
You notice a powerful taste when you use solidified soy sauce. The concentrated form gives you a stronger flavor than regular liquid soy sauce. You only need a small amount to add depth to your dishes. The long fermentation process creates a rich umami sensation. This comes from special compounds that develop during fermentation.
- Free amino acids boost the savory taste.
- Nucleotides add complexity and make the flavor linger.
- Small peptides enhance both salty and umami notes.
These compounds work together to create a bold taste. You can use solidified soy sauce in marinades, stir-fries, or dipping sauces. The flavor stands out and makes your food memorable. You control the intensity by adjusting the amount you use.
Aroma Experience
You experience a unique aroma when you open solidified soy sauce. The scent is more concentrated than liquid soy sauce. The drying process locks in the fragrance. You smell a mix of savory, sweet, and roasted notes.
A variety of volatile compounds create this aroma:
- Acids give a tangy scent.
- Alcohols add warmth.
- Aldehydes bring a hint of sweetness.
- Esters offer fruity tones.
- Furanones and pyrazines create roasted and caramel notes.
- Sulfur compounds add depth.
You can use the aroma to enhance your cooking. Sprinkle solidified soy sauce on hot food and let the scent fill your kitchen. The aroma signals quality and freshness. You enjoy both the taste and the smell in every meal.
| Compound Type | Aroma Contribution |
| Acids | Tangy |
| Alcohols | Warm |
| Aldehydes | Sweet |
| Esters | Fruity |
| Furanones | Roasted, caramel |
| Pyrazines | Nutty, roasted |
| Sulfur compounds | Deep, savory |
You discover new layers of flavor and aroma each time you use solidified soy sauce. This product helps you create dishes that taste and smell amazing.
Culinary Uses and Versatility

Solidified Soy Sauce in Cooking
You can use solidified soy sauce in many ways to make your meals more flavorful. Chefs and home cooks add it to stir-fries, giving dishes a deeper and richer taste. You might find it helpful when making marinades, as it brings out the best in meats and vegetables. Many people use it in dipping sauces, making them more savory and complex.
- Add it to soups or stews to boost the overall flavor.
- Use it as a glaze for meats or vegetables to create a unique texture and taste.
- Slice or grate it over noodles or rice for precise flavor control.
Solidified soy sauce gives you more options in the kitchen. You can use it as a finishing touch or as the main flavor in a dish. It opens up new ways to try recipes from around the world. You can blend it into salad dressings or use it as a base for homemade sauces. It melts easily, giving your food a rich color and taste.
Reconstitution and Applications
You will find solidified soy sauce easy to use in any kitchen. The solid form is simple to handle and blend, making it suitable for home cooks, professional chefs, and food manufacturers. You can keep it in your pantry for a long time, so you do not need to buy soy sauce often. It does not spill or leak, which makes it convenient and safe to store.
To reconstitute, just mix the solid with water. You can adjust the amount to get the flavor strength you want. This flexibility helps you control the taste of your dishes. The solid form is easy to measure and blend into recipes, making cooking more enjoyable.
Solidified soy sauce also helps food manufacturers ship more product at a lower cost. It lasts longer than liquid soy sauce, so you waste less and make fewer trips to the store. You get the same rich flavor and nutritional benefits as liquid soy sauce, but with added convenience and versatility.
Advantages and Practical Benefits
Cost-Effectiveness and Shipping
You can save a lot of money and space by choosing solidified soy sauce. This product takes up less room in your warehouse and costs less to ship than regular soy sauce. When you use a concentrated form, you need fewer pallets and less storage space.
Quality and Convenience
You get more than just savings. You enjoy high quality and easy use with this product. Many chefs and food professionals praise solidified soy sauce for its strong flavor and simple handling. You can add it quickly to any dish without measuring liquids. This makes your cooking faster and cleaner.
A recent industry report shows that more people want sauces that are easy to use and fit into their daily meals. The table below highlights key points:
| Evidence Description | Key Points |
| Growing demand for soy-based cooking sauces | Emphasizes convenience and integration into home cooking. |
| Preference for flavor reliability and compatibility with recipes | Enhances consumer confidence and supports meal preparation operations. |
| Projected market share of soy-based cooking sauces in 2025 | Expected to account for 42.30% of cooking sauce demand, showing their importance in kitchens. |
You can trust that solidified soy sauce will work in many recipes. Chefs like it because it fits Asian, American, and European dishes. The strong taste and easy storage help you create great meals with less effort. As more people look for reliable and convenient products, you will see this soy sauce become even more popular in kitchens everywhere.
You have learned how solidified soy sauce brings new flavor and convenience to your kitchen. This product gives you strong taste, easy storage, and many ways to use it in your meals. You can try it in your favorite recipes or explore new dishes. Discover how solidified soy sauce can make your cooking more exciting and practical.
FAQ
How do you store solidified soy sauce?
You should keep solidified soy sauce in a cool, dry place. Make sure the container stays tightly sealed. This helps keep the flavor fresh and prevents moisture from getting in.
Can you use solidified soy sauce just like liquid soy sauce?
Yes, you can use it in the same way. Add it directly to dishes or dissolve it in water to make liquid soy sauce. You control the strength by adjusting the amount.
How do you reconstitute solidified soy sauce?
Mix the solidified soy sauce with water. Stir until it dissolves. Use more or less water to get the taste you want.
Is solidified soy sauce healthy?
Solidified soy sauce keeps the nutrition of traditional soy sauce. It contains protein, amino acids, and minerals from soybeans. You get the same health benefits in a more convenient form.
Is Konjac Jelly Really Zero Calorie? Everything You Need to Know
Konjac jelly has become one of the most popular healthy snacks in recent years. From fitness enthusiasts to parents looking for better snack options for their children, many consumers are attracted by its reputation as a "low-calorie" or even "zero-calorie" snack. But is konjac jelly really zero calorie? Let's take a closer look at the facts.
What Is Konjac Jelly?
Konjac jelly is made from konjac powder, which is derived from the root of the konjac plant. The key component of konjac is glucomannan, a natural water-soluble dietary fiber known for its ability to absorb water and create a satisfying texture with very few calories. Konjac jelly is often combined with fruit juice to enhance flavor and create a delicious, convenient snack. Many modern drinkable konjac jellies also feature squeezable pouch packaging, making them ideal for on-the-go consumption.
Is Konjac Jelly Truly Zero Calorie?
The short answer is: not always.
Pure konjac fiber itself contains very few calories because it is mostly dietary fiber. However, most commercial konjac jelly products include additional ingredients such as:
- Fruit juice
- Natural sweeteners
- Fruit puree
- Flavorings
These ingredients contribute some calories to the final product. As a result, most konjac jellies are low-calorie rather than completely zero-calorie.
Some sugar-free versions may contain extremely low calorie levels and can be marketed as "near zero calorie" depending on local food regulations. However, consumers should always check the nutrition label rather than relying solely on front-of-pack claims.
Why Is Konjac Jelly Considered a Healthy Snack?
1. Low Calorie Content
Compared with traditional desserts, cakes, or sugary snacks, konjac jelly generally contains significantly fewer calories while still providing a pleasant texture and satisfying eating experience.
2. High in Dietary Fiber
Glucomannan fiber helps create a feeling of fullness, making konjac jelly a popular option among consumers looking for portion-controlled snacks.
3. Convenient and Portable
Modern drinkable konjac jelly products are commonly packed in squeezable pouches that are easy to carry, store, and consume anytime. This convenience has contributed to the growing popularity of konjac jelly worldwide.
4. Fruit-Based Flavor Experience
Many premium products combine konjac with real fruit juice, offering refreshing fruit flavors while maintaining a healthier nutritional profile. JoyGlo Food's drinkable konjac jelly, for example, uses pure fruit juice with no added water and is designed to deliver a more authentic fruit taste.
What Should Consumers Look for When Buying Konjac Jelly?
Not all konjac jellies are created equal. When selecting a product for your retail line or personal consumption, consider the following key factors:
Juice Content: Higher fruit juice content often provides a more natural fruit flavor experience rather than relying heavily on artificial flavorings.
Added Sugar: Choose products with reduced sugar or naturally sweetened formulations (such as erythritol or stevia) if you are monitoring daily sugar intake.
Clean Label Ingredients: Global consumers increasingly prefer products made with natural ingredients and fewer artificial additives. Industry trends show a strong, consistent demand for clean-label snacks and beverages across Western markets.
Certifications: For bulk B2B sourcing, international food safety certifications such as HACCP, HALAL, FDA registration, and FSSC22000 are essential. They indicate robust food safety and strict quality management systems. JoyGlo's drinkable konjac jelly products, for instance, are fully produced under these internationally recognized standards.
Why Is Konjac Jelly Growing So Fast Globally?
Modern consumer preferences are shifting dramatically toward healthier snacking habits, specifically favoring:
- Lower-calorie and guilt-free snacks
- Functional foods with high dietary fiber
- On-the-go portable packaging solutions
- Natural, clean-label plant-based ingredients
- Innovative, satisfying gel textures
Global market research indicates continued robust growth in the healthy jelly market, heavily driven by demand for clean-label formats and natural fruit ingredients. Konjac jelly aligns perfectly with these market shifts by successfully merging convenience, plant-based nutrition, and texture innovation.
Final Thoughts
So, is konjac jelly really zero calorie? Not necessarily. While konjac itself contains very few calories, most fruit-flavored commercial konjac jellies contain minor calories derived from real fruit juice and natural sweeteners. However, compared with conventional high-sugar snacks, cakes, and traditional gelatin desserts, konjac jelly remains an exceptional, low-calorie alternative.
For worldwide consumers seeking a delicious, portable, and fruit-infused snack experience, drinkable konjac jelly offers an appealing balance of taste, convenience, and modern nutrition. As manufacturers continue to innovate with higher juice content and cleaner formulations, konjac jelly is highly projected to remain one of the fastest-growing categories in the global functional snack market.
Konjac Jelly vs. Traditional Candy: Why Your Body Will Thank You
In today's health-conscious world, consumers are becoming more selective about the snacks they eat. While traditional candy remains a popular treat, many people are looking for alternatives that satisfy their sweet cravings without excessive sugar and calories. One snack that has gained significant attention is konjac jelly. But how does it compare to traditional candy, and why might your body thank you for making the switch?
What Is Konjac Jelly?
Konjac jelly is a fruit-based snack made with konjac powder, which comes from the root of the konjac plant. Its key ingredient, glucomannan, is a natural dietary fiber known for its ability to absorb water and create a satisfying jelly texture.
Unlike traditional candy, which is primarily made from sugar, syrup, and artificial flavorings, konjac jelly often combines fruit juice, fruit puree, and dietary fiber to create a delicious yet lighter snacking experience.
Many modern products, such as drinkable konjac jelly pouches, also offer convenient on-the-go packaging and innovative fruit flavors that appeal to both children and adults.
What is Glucomannan? The Science Behind the Konjac Plant
Glucomannan is becoming one of the most important natural dietary fibers in the global functional food industry. It is the key bioactive component behind konjac-based products such as konjac jelly, konjac noodles, and low-calorie snacks. But what exactly is glucomannan, and why is it gaining so much attention in both food science and global snack markets?
1. What is Glucomannan?
Glucomannan is a water-soluble polysaccharide dietary fiber extracted from the root of the konjac plant (Amorphophallus konjac).
Scientific structure:
- Composed mainly of mannose and glucose units
- Extremely high molecular weight fiber
- Strong water absorption ability (forms gel-like texture)
In simple terms: It is a plant fiber that can turn water into a thick, elastic gel — this is why konjac jelly has its unique texture.
2. Why Glucomannan Behaves So Specially (Science Explained)
The key scientific property of glucomannan is its high viscosity and swelling capacity. When it meets water:
- It can absorb up to 50–100 times its weight in water
- Forms a stable gel network
- Slows gastric emptying rate
- Increases satiety (feeling full)
This physical behavior explains why glucomannan is widely used in low-calorie foods, dietary fiber supplements, and weight management products. Recent nutritional studies show glucomannan may also support:
- Blood sugar control
- LDL cholesterol reduction
- Gut microbiota balance
3. Global Market Growth (Latest Data)
Glucomannan is no longer a niche ingredient — it is becoming a global functional food driver.
Market size insights:
- Global glucomannan market (2025): ~$1.42 billion
- Expected market size (2034): ~$2.71 billion
- CAGR: 7.4%–8.2% depending on segment analysis
Regional distribution & Drivers:
- Asia Pacific: ~47.8% market share (dominant production region)
- North America: fastest growth region (health & diet trends)
- Key growth drivers: Rising obesity awareness, Clean-label food demand, Plant-based diet trends, Functional fiber consumption
4. Why Glucomannan Is Used in Konjac Jelly
In modern food applications, glucomannan is the core structural ingredient in konjac jelly products. It enables a chewy jelly texture, low-calorie formulation, sugar-reduction capability, and a stable fruit juice suspension system.
At JoyGlo Food, glucomannan is combined with real fruit juice, fruit pulp, and innovative pouch packaging. This creates products such as Drinkable Konjac Jelly, Whole Fruit Jelly, and Fruit Juice Jelly Snacks designed for global retail markets.
5. Konjac Jelly vs Traditional Snacks (Data Comparison)
| Category | Calories | Fiber | Sugar | Satiety |
|---|---|---|---|---|
| Konjac Jelly | Low | High | Low | High |
| Candy | High | Low | High | Low |
| Chocolate | High | Low | High | Medium |
Conclusion: Konjac-based snacks offer a lower-calorie, higher-fiber alternative to traditional confectionery.
6. Health & Functional Role (Scientific View)
Modern clinical research highlights several key effects of glucomannan:
✔ Satiety Support: Expands in stomach → reduces appetite.
✔ Digestive Function: Acts as soluble fiber → supports gut health.
✔ Metabolic Support: Linked to improved lipid and glucose regulation.
✔ Clean-Label Ingredient: Plant-derived, minimal processing.
⚠️ Important note: Glucomannan must be consumed with sufficient water to avoid digestive discomfort.
7.Why the World Is Moving Toward Konjac Ingredients
Global consumer preferences are shifting toward low sugar diets, high fiber foods, functional snacks, plant-based ingredients, and portable packaging formats. Konjac-based products fit perfectly into these trends, especially in Asia (Japan, China, Korea), the Middle East functional snacks market, the Europe clean-label food sector, and the North America diet supplement category.
8. Industrial Application (Beyond Food)
Glucomannan is also widely utilized in food thickener systems, pharmaceutical excipients, controlled-release materials, and vegan food texture engineering. This makes it a multi-industry functional ingredient, not just a simple food additive.
9. JoyGlo Food Innovation (Application Case)
As a manufacturer specializing in jelly and beverage products, JoyGlo Food successfully integrates glucomannan into drinkable konjac jelly (squeeze pouch format), whole fruit jelly (with real fruit inside), mixed fruit jelly desserts, and OEM/private label jelly products.
Core advantage: Fruit + Fiber + Fun packaging = modern healthy snack system.
Final Conclusion
Glucomannan is not just a dietary fiber — it is a scientifically functional ingredient driving the future of healthy food innovation. From its unique water-absorbing structure to its expanding global market value, glucomannan is reshaping how consumers think about snacks and functional foods.
With increasing demand for low sugar, high fiber, clean label, and plant-based products, konjac-based innovations are highly expected to continue strong global growth over the next decade.
The Natural Beverage Consumers Are Falling in Love With
Southeast Asia has always been known for its rich tropical fruits and vibrant beverage culture. In recent years, however, one traditional drink has been making a strong comeback: sugarcane juice.
From Thailand's street markets and Vietnam's local cafés to modern convenience stores and supermarkets across Singapore, consumers are increasingly choosing sugarcane juice as a refreshing alternative to carbonated soft drinks and artificially flavored beverages.
So why is sugarcane juice becoming one of the fastest-growing natural beverage trends in Southeast Asia?
Let's explore the reasons behind its rising popularity.
1. Consumers Are Looking for More Natural Drinks
Today's consumers are paying closer attention to ingredient lists than ever before.
Across Southeast Asia, health-conscious shoppers are actively seeking beverages that contain:
· Natural ingredients
· No artificial colors
· No artificial preservatives
· Less processing
· Authentic fruit or plant-based flavors
Market research shows that the Southeast Asian juice market continues to grow as consumers shift toward healthier and more natural beverage options. Products perceived as fresh, clean-label, and naturally sourced are becoming increasingly popular.
Sugarcane juice fits perfectly into this trend.
Unlike many conventional soft drinks, sugarcane juice is naturally sweet and derived directly from fresh sugarcane stalks, offering consumers a more authentic drinking experience.
2. Sugarcane Is Deeply Rooted in Southeast Asian Culture
Sugarcane has been cultivated in Southeast Asia for centuries and remains one of the region's most important agricultural crops.
Countries such as Thailand, Vietnam, and the Philippines have extensive sugarcane production and long-standing traditions of consuming fresh sugarcane juice. Sugarcane cultivation continues to expand in several Southeast Asian countries due to strong demand and improving productivity.
For many consumers, sugarcane juice is more than just a beverage—it is a familiar taste associated with childhood memories, local markets, and traditional lifestyles.
As younger consumers increasingly seek authentic local flavors, sugarcane juice is experiencing a revival in modern retail channels.
3. The Rise of Functional and Wellness Beverages
Another major driver is the growing demand for beverages that offer more than simple refreshment.
Consumers today are looking for drinks that support:
· Daily hydration
· Natural energy
· Better lifestyle choices
· Plant-based nutrition
The global beverage industry is witnessing strong growth in functional and wellness-focused drinks, with natural ingredients becoming a key purchasing factor.
Sugarcane juice naturally contains:
· Carbohydrates for quick energy
· Potassium
· Calcium
· Magnesium
· Trace antioxidants
This makes it attractive to consumers seeking a natural refreshment option instead of heavily processed drinks.
4. Convenience Is Expanding the Market
Traditionally, sugarcane juice was mainly sold by street vendors and consumed fresh.
However, advances in food processing and packaging technology are changing the game.
Modern aseptic filling, retort processing, and pouch packaging technologies now allow manufacturers to offer:
· Ready-to-drink sugarcane juice
· Portable pouch packaging
· Longer shelf life
· Consistent product quality
This transformation is helping sugarcane juice move from local street stalls into supermarkets, convenience stores, e-commerce platforms, and export markets.
Industry reports indicate growing opportunities for packaged sugarcane juice products as consumers seek convenient, natural beverages with modern retail availability.
5. Premium Flavor Innovation Is Driving New Demand
Modern consumers want more than traditional flavors.
To attract younger generations, manufacturers are introducing innovative sugarcane juice combinations such as:
· Sugarcane & Pear
· Sugarcane & Loquat
· Sugarcane & Hawthorn
· Sugarcane & Lemon
· Sugarcane & Coconut
These combinations retain the natural sweetness of sugarcane while adding unique regional fruit flavors.
At JoyGlo Food, our sugarcane beverage series combines carefully selected sugarcane juice with premium fruit ingredients to create refreshing and distinctive flavor profiles designed for modern consumers.
Popular varieties include:
· Sugarcane & Pear Juice
· Sugarcane & Loquat Juice
· Sugarcane & Hawthorn Juice
These products offer a smooth taste experience while preserving the authentic character of sugarcane.
6. Strong Growth Potential for Private Label Brands
As demand increases, sugarcane juice is also creating new opportunities for:
· Importers
· Distributors
· Supermarkets
· Convenience store chains
· Private label brands
The global sugarcane juice market is projected to continue expanding, supported by growing consumer interest in natural and functional beverages. Asia-Pacific remains the largest and fastest-growing region.
For brands looking to differentiate themselves in competitive beverage markets, sugarcane juice offers:
✅ Authentic regional appeal
✅ Natural ingredient positioning
✅ Premium flavor innovation opportunities
✅ Strong consumer recognition
✅ OEM & Private Label flexibility
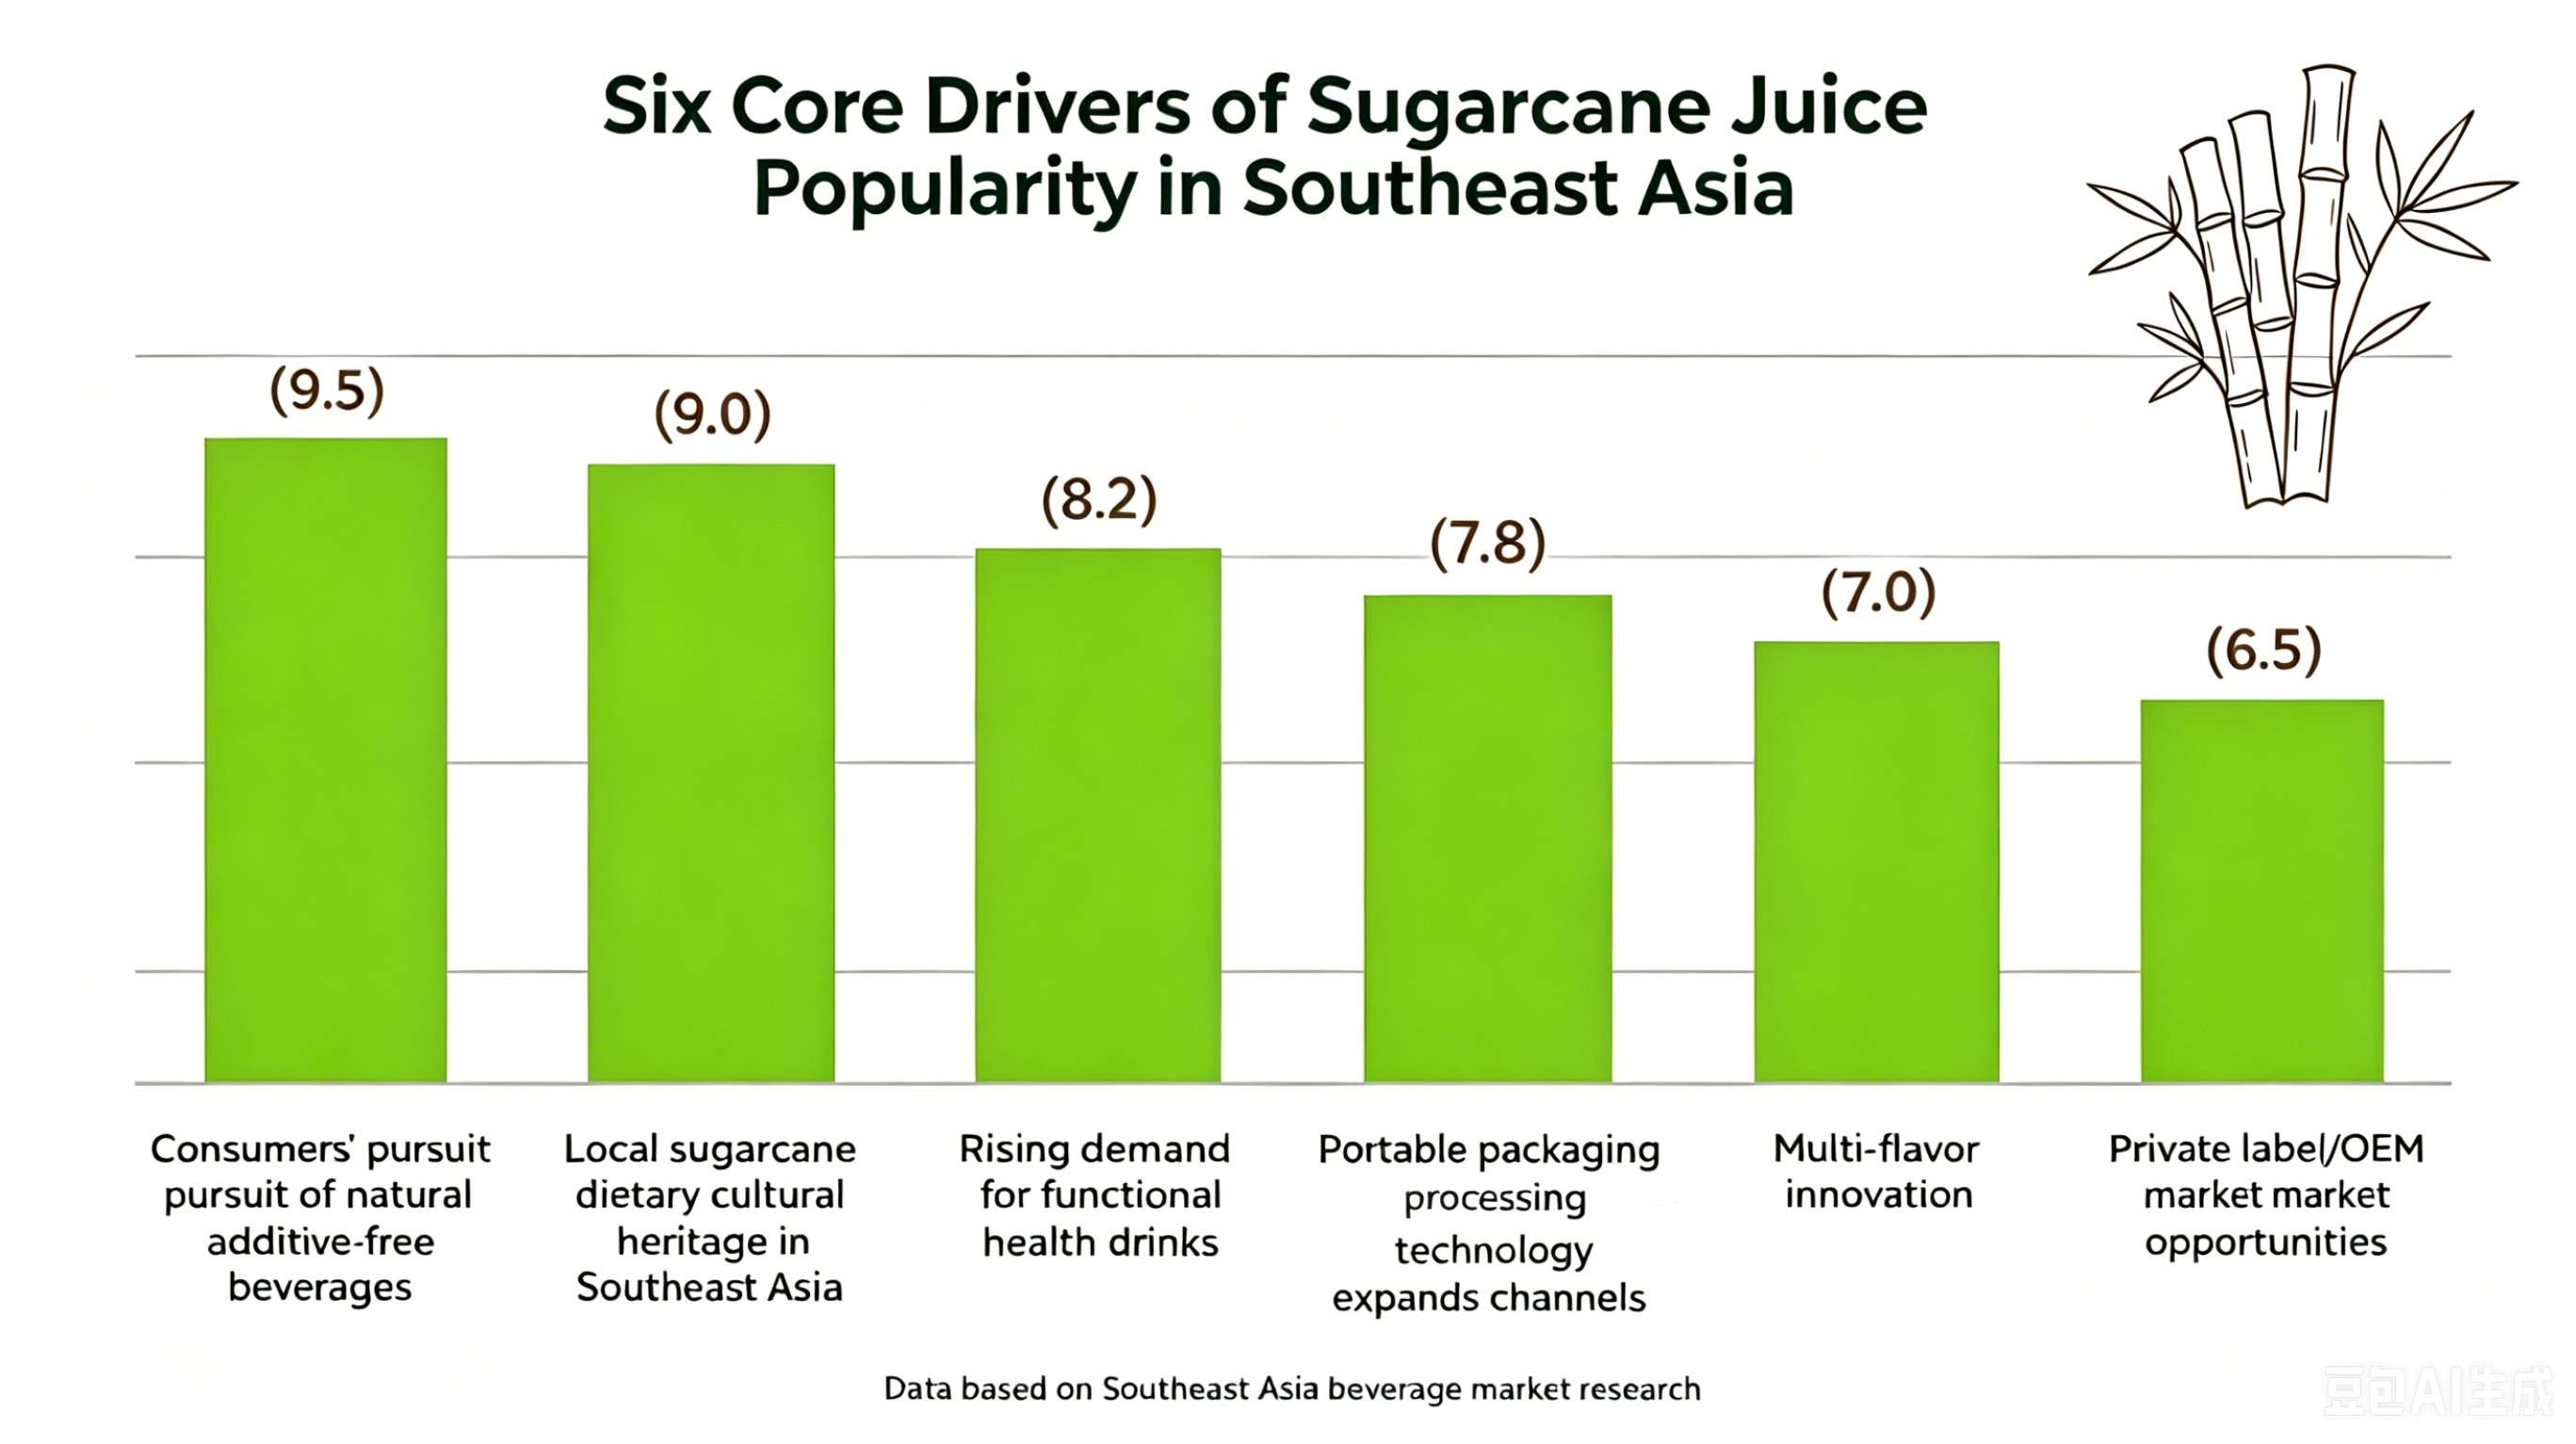
The Future of Sugarcane Juice
The success of sugarcane juice reflects a broader shift in consumer preferences.
People are moving away from overly processed beverages and toward products that feel more natural, authentic, and connected to local food culture.
With abundant sugarcane resources, continuous product innovation, and growing demand for healthier beverages, Southeast Asia is well positioned to become a global hub for sugarcane-based drinks.
For beverage brands, distributors, and importers, now may be the perfect time to explore the opportunities this fast-growing category has to offer.
About JoyGlo Food
JoyGlo Food specializes in innovative fruit jelly, fruit beverages, sugarcane juice drinks, and OEM/private label manufacturing services.
We offer customized formulations, packaging solutions, and private label development for global partners looking to bring unique beverage concepts to market.
Ever feel like your meal looks pale or tastes flat? You’re not alone. Dark soy sauce is your secret weapon for rich flavor and vibrant color. Grab Pearl River Bridge’s Superior Dark Soy Sauce. You’ll see how it brings out the best in your cooking and transforms every bite.

Dark Soy Sauce for Flavor and Color
Fixing Bland Dishes
Have you ever tasted a dish and thought, “This needs more flavor”? You can fix bland food with dark soy sauce. When you add soy sauce to your recipe, you unlock a deep, rich flavor that makes every bite exciting. Pearl River Bridge’s Superior Dark Soy Sauce stands out because it goes through a 100+ day fermentation. This process creates a unique aroma and taste that you won’t find in regular soy sauce or light soy sauce. You can use soy sauce in soups, stews, or even a stir-fry. It brings out the natural flavors of soy and other ingredients. If you want to boost flavor in your cooking, try adding a splash of soy sauce. You’ll notice the difference right away.
Enhancing Food Color
Nobody likes pale food. You want your meals to look as good as they taste. Dark soy sauce gives your dishes a deep brown color that makes them look appetizing. Pearl River Bridge’s Superior Dark Soy Sauce has a rich, dark hue because of its long fermentation and quality soybeans. When you add soy sauce to rice, noodles, or vegetables, you get a beautiful color that stands out. Black soy sauce works well for braised dishes and roasted meats. It adds shine and depth to your food. Light soy sauce is good for seasoning, but it doesn’t give the same color as dark soy sauce. You can use soy sauce to make your meals look restaurant-quality.
Here’s a quick table to show how different soy sauces affect color:
| Soy Sauce Type | Color Effect | Best Use |
| Dark Soy Sauce | Deep brown, glossy | Braising, stews, rice |
| Light Soy Sauce | Light amber | Dipping, seasoning |
| Black Soy Sauce | Very dark, shiny | Roasts, BBQ, marinades |
| Sweet Soy Sauce | Dark, slightly red | Glazes, dipping |
Umami Boost in Cooking
You want your food to taste savory and satisfying. That’s where soy sauce comes in. Dark soy sauce is packed with umami, the “fifth taste” that makes food delicious. Pearl River Bridge’s Superior Dark Soy Sauce uses high-quality soybeans and a special fermentation process. This creates a bold flavor that enhances everything from meat to vegetables. You can use soy sauce in marinades, stir-fry, or even salad dressings. Black soy sauce gives a stronger umami punch, while light soy sauce offers a milder taste. Sweet soy sauce adds a touch of sweetness. When you cook with soy sauce, you get layers of flavor that make your meals memorable.
You can use soy sauce for more than just flavor. It also brings nutritional benefits. Soybeans are full of protein and minerals. When you use soy sauce in your cooking, you add both taste and nutrition. Pearl River Bridge’s Superior Dark Soy Sauce is a great choice for home cooks who want authentic flavor and healthy meals.

Depth, Balance, and Soy Sauce Substitutes
Adding Depth to Simple Recipes
You want your food to taste amazing, right? Sometimes, you follow a recipe and the result feels flat. You can fix this with dark soy sauce. This sauce brings complexity to soups, stews, and marinades. When you add soy sauce, you unlock layers of flavor. You get a deep, rich taste that makes every bite interesting. Pearl River Bridge’s Superior Dark Soy Sauce stands out because it uses high-quality soybeans and a long fermentation process. The sunshine, water, and air from Southern China help create a unique aroma and flavor.
Try adding soy sauce to your favorite soup. You will notice the broth tastes fuller. If you make a stew, a splash of soy sauce gives the sauce a deep brown color and bold flavor. You can use soy sauce in marinades for meat or tofu. The soy sauce helps the ingredients soak up flavor and become tender. Black soy sauce works well for braised dishes. It gives a strong umami punch and a glossy finish. Sweet soy sauce adds a touch of sweetness and color. Light soy sauce is good for seasoning, but it does not give the same depth as dark soy sauce.
Balancing Seasoning in Cooking
You know how easy it is to mess up seasoning. Sometimes, you add too much salt. Other times, your dish needs more flavor. Soy sauce can help you fix both problems. When you use soy sauce, you add saltiness and umami at the same time. This makes your food taste balanced and delicious.
If your soup is too salty, you can add a little water and then a splash of soy sauce. The soy sauce brings back flavor without making it too salty. If your stew tastes bland, add soy sauce and taste again. You can use soy sauce in stir-fry, rice, or noodles. The soy sauce helps balance the flavors and makes your meal taste just right.
Choosing Soy Sauce Substitutes
You might wonder if you can use other sauces instead of soy sauce. There are many soy sauce substitutes, but not all give the same flavor or color. Some people use Worcestershire sauce, tamari, or coconut aminos. These soy sauce substitutes work in a pinch, but they do not offer the same depth as dark soy sauce.
Pearl River Bridge’s Superior Dark Soy Sauce is a better choice. It uses high-quality soybeans and a special fermentation process. This gives you a bold flavor and deep color. Black soy sauce is great for braised dishes and marinades. Sweet soy sauce works for glazes and dipping. Light soy sauce is good for seasoning, but it does not give the same richness.
Here’s a table comparing soy sauce substitutes:
| Substitute | Flavor Profile | Best Use |
| Worcestershire | Tangy, mild | Meat, sauces |
| Tamari | Mild, gluten-free | Dipping, stir-fry |
| Coconut Aminos | Sweet, light | Dressings, marinades |
| Dark Soy Sauce | Deep, rich, umami | Braising, stews, rice |
FAQ
What is the difference between soy sauce and light soy sauce?
You see soy sauce in many recipes. Light soy sauce tastes saltier and looks lighter. Soy sauce gives a deep color. Both come from soy, but each brings a different flavor.
Can I use soy sauce for noodles and other dishes?
Yes! You can use soy sauce for noodles, rice, or even vegetables. Soy sauce adds flavor and color. Soy sauce comes from soy. Try soy sauce in your favorite cooking.
Is soy sauce healthy, and what makes it special?
Soy sauce uses soy and water. Soy sauce has protein from soy. You get a rich flavor. Soy sauce works in many recipes. Soy sauce is a classic choice for cooking.
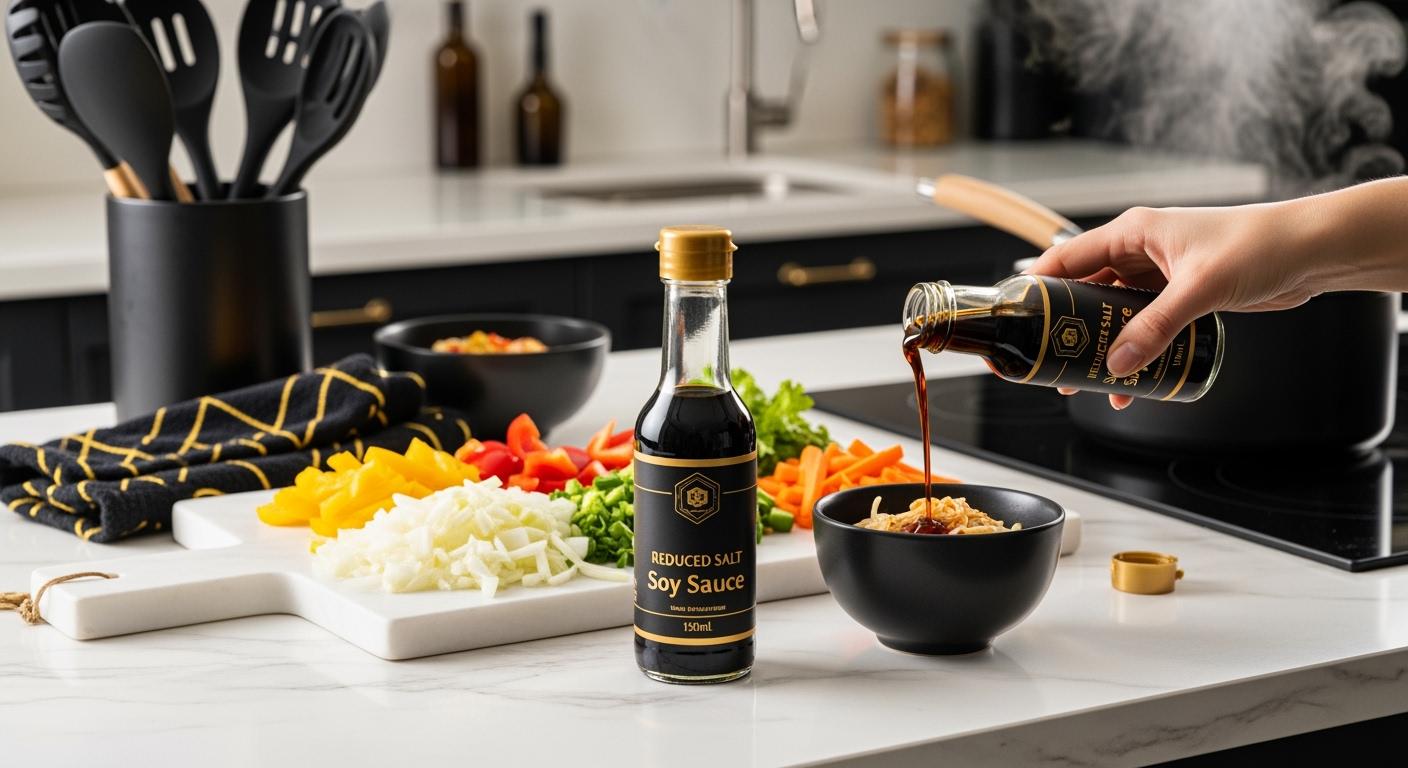
Switching to Reduced Salt Soy Sauce 150ml transformed the way he approached healthy cooking. He expected a compromise on flavor or texture but discovered a balance between wellness and taste. His daily meals now reflect a more mindful approach. Readers can consider how small changes might benefit their own kitchens.
First Impressions with Reduced Salt Soy Sauce 150ml

Why I Switched
He noticed a growing need for healthier choices in his kitchen. After reading about the benefits of reduced sodium and gluten-free diets, he decided to try Pearl River Bridge Gluten Free Soy Sauce. The product’s label highlighted its gluten-free status and traditional fermentation process. He valued the 150ml size for its convenience and freshness. He wanted a soy sauce that would fit his dietary needs without sacrificing taste. The promise of a Gluten Free Low Sodium Soy Sauce appealed to his desire for mindful eating. He believed that small changes, like switching to Reduced Salt Soy Sauce 150ml, could make a significant impact on his overall well-being.
“He realized that every ingredient matters when it comes to health,” he reflected.
Initial Observations
He opened the bottle and immediately noticed the rich aroma. The color appeared deep and inviting, much like traditional soy sauce. The texture felt smooth and poured easily, which made it simple to control portions. He appreciated the compact 150ml bottle, which fit perfectly on his kitchen table and encouraged regular use. The flavor surprised him with its balance—savory, yet not overwhelmingly salty. He found that Pearl River Bridge Gluten Free Soy Sauce enhanced his dishes without overpowering them. The gluten-free assurance gave him peace of mind, especially when cooking for friends with sensitivities. He felt confident that Reduced Salt Soy Sauce 150ml would become a staple in his daily routine.
Taste Comparison
Flavor in Everyday Dishes
He noticed a distinct difference when he first used Reduced Salt Soy Sauce 150ml in his daily meals. The aroma greeted him with a deep, savory note that felt familiar yet lighter than traditional soy sauces. He found that the sauce delivered a balanced umami flavor, enhancing the natural taste of vegetables, meats, and grains. The reduced salt content allowed the other ingredients in his stir-fries and marinades to shine. He appreciated how the sauce complemented rather than dominated the dish.
He often prepared simple meals like steamed broccoli, chicken stir-fry, or tofu bowls. In each case, Pearl River Bridge Gluten Free Soy Sauce brought out the best in the ingredients. The sauce worked well as a dipping sauce for dumplings and sushi, providing a satisfying depth without overwhelming the palate. He observed that the gluten-free formula did not compromise the traditional taste profile. Instead, it offered a clean, smooth finish that made each bite enjoyable.
Tip: For those who enjoy bold flavors, he recommends adding a splash of Reduced Salt Soy Sauce 150ml at the end of cooking. This preserves the sauce’s aroma and gives dishes a fresh, savory lift.
Adjusting for Umami
He learned that adjusting for umami became essential when using a Gluten Free Low Sodium Soy Sauce. The lower sodium level meant he could use a slightly larger amount without making the dish too salty. This allowed the rich, fermented notes to come forward, creating a satisfying mouthfeel. He sometimes paired the sauce with ingredients like mushrooms, seaweed, or sesame oil to boost the umami effect in soups and stir-fries.
He experimented with classic recipes, such as fried rice and noodle bowls. The Reduced Salt Soy Sauce 150ml blended seamlessly, offering a mellow saltiness and a subtle sweetness. He found that the sauce’s traditional fermentation process contributed to its complex flavor, even with less sodium. The 150ml bottle made it easy to control portions, ensuring that each meal received just the right amount of seasoning.
He valued the versatility of Pearl River Bridge Gluten Free Soy Sauce in both Asian and Western dishes. Whether he prepared a marinade for grilled salmon or a vinaigrette for salads, the sauce provided a consistent, savory base. He discovered that the gluten-free aspect made it suitable for guests with dietary restrictions, broadening his recipe options.
Note: He suggests tasting the dish before adding extra salt, as the umami from Reduced Salt Soy Sauce 150ml often provides enough depth on its own.
Health and Nutrition Benefits
Lower Sodium Impact
He recognized that sodium intake plays a significant role in overall health. Many people consume more salt than recommended, which can contribute to high blood pressure and cardiovascular issues. Reduced Salt Soy Sauce 150ml offers a practical solution for those who want to lower their sodium consumption without giving up flavor. The careful fermentation process preserves the umami and depth of traditional soy sauce, while reducing the salt content. He found that using this Gluten Free Low Sodium Soy Sauce allowed him to season his meals more mindfully. He could enjoy savory dishes with less concern about excess sodium.
Tip: He suggests reading nutrition labels to understand sodium levels in everyday condiments. Small changes, like switching to a reduced salt option, can have a positive impact on long-term health.
Gluten-Free Advantages
He valued the gluten-free certification of Pearl River Bridge Gluten Free Soy Sauce. Gluten sensitivity and celiac disease affect many individuals, making it essential to choose safe ingredients. This soy sauce uses only gluten-free raw materials, ensuring that it fits into a wide range of dietary needs. He felt confident serving meals to friends and family, knowing that everyone could enjoy the same rich taste. The product’s versatility made it suitable for both Asian and Western recipes, expanding his cooking options.
Below is a summary of the key features and benefits:
|
Feature |
Benefit |
|---|---|
|
Reduced sodium |
Supports heart health |
|
Gluten-free |
Safe for gluten-sensitive individuals |
|
Traditional fermentation |
Maintains authentic flavor |
|
150ml bottle |
Convenient for home use |
|
Versatile application |
Suitable for various cuisines |
He concluded that Reduced Salt Soy Sauce 150ml supports a balanced lifestyle. It provides a flavorful, safe, and convenient choice for health-conscious and gluten-sensitive cooks.
Cooking with Reduced Salt Soy Sauce 150ml

Recipe Adjustments
He adapted his cooking routines to maximize the benefits of Reduced Salt Soy Sauce 150ml. Stir-fries became more vibrant when he added the sauce near the end of cooking. This method preserved the aroma and allowed vegetables to retain their crisp texture. Marinades gained depth with a measured splash of Pearl River Bridge Gluten Free Soy Sauce. He used the sauce as a base for dipping, blending it with fresh ginger or garlic for extra flavor. Simple recipes, such as steamed fish or tofu, received a savory boost without overwhelming the natural taste. He experimented with Gluten Free Low Sodium Soy Sauce in salad dressings, combining it with sesame oil and rice vinegar for a balanced profile.
Tip: He recommends tasting the dish before adding more seasoning. The sauce’s umami often eliminates the need for extra salt.
Portion and Storage Tips
He found the 150ml bottle ideal for portion control. The compact size encouraged mindful use and reduced waste. He stored the bottle in a cool, dry place, away from direct sunlight. After opening, he kept it refrigerated to maintain freshness and flavor. The sauce’s traditional fermentation process ensured a stable shelf life. He checked the label for expiration dates and used the sauce within a few months for optimal taste.
|
Storage Method |
Benefit |
|---|---|
|
Refrigeration |
Preserves aroma |
|
Cool, dry location |
Prevents spoilage |
|
Portion control |
Reduces waste |
He maximized flavor by shaking the bottle before each use. This distributed the rich fermented notes evenly. He avoided overusing the sauce, relying on its concentrated taste to enhance dishes. The 150ml size proved convenient for daily cooking and easy to handle during meal prep.
Brand Choices and Value
Comparing Brands
He noticed that the market offers a wide range of soy sauces, each with unique qualities. Some focus on traditional brewing, while others highlight health benefits. Pearl River Bridge Gluten Free Soy Sauce stands out for its careful fermentation and gluten-free assurance. Many consumers look for products that balance taste and wellness. He observed that Gluten Free Low Sodium Soy Sauce appeals to those who want to reduce sodium without losing flavor. The 150ml bottle size also provides convenience for home cooks who value freshness and portion control.
When selecting a soy sauce, he considered several factors:
-
Flavor Profile: He prioritized a rich, authentic taste that complements various dishes.
-
Health Benefits: He looked for reduced sodium and gluten-free options to support dietary needs.
-
Packaging: He valued a bottle size that fits easily in the kitchen and encourages mindful use.
-
Versatility: He preferred a sauce that works well in both Asian and Western recipes.
Note: He recommends reading ingredient lists and nutrition labels to ensure the product aligns with personal health goals.
Is It Worth It?
He found that investing in Reduced Salt Soy Sauce 150ml brought value to his kitchen. The product delivered consistent flavor and supported his commitment to healthier eating. Pearl River Bridge Gluten Free Soy Sauce offered peace of mind for gluten-sensitive guests. The convenient bottle size reduced waste and kept the sauce fresh. He concluded that choosing a high-quality Gluten Free Low Sodium Soy Sauce can enhance daily meals and support long-term wellness. For those seeking both taste and health, this product proves to be a worthwhile addition to the pantry.
Common Concerns and Tips
Family Reactions
He noticed that introducing a new condiment often raised questions at the dinner table. Family members sometimes expressed concern about changes in taste or texture. He addressed these worries by preparing familiar dishes with the new sauce. The subtle flavor of Reduced Salt Soy Sauce 150ml blended well with everyday meals. Children and adults alike responded positively after the first few bites. He observed that the gluten-free label reassured relatives with dietary sensitivities. The transition felt smooth because the sauce maintained the umami depth everyone expected. He encouraged open feedback, which helped him adjust recipes to suit different preferences.
Tip: Serve a favorite family recipe using the new sauce first. Familiarity helps ease the transition and builds trust in the product.
Mistakes to Avoid
He learned several lessons during the switch to Gluten Free Low Sodium Soy Sauce. Over-seasoning became a risk when he forgot that the sauce’s flavor profile differed from regular soy sauce. He now tastes dishes before adding extra salt or seasoning. He also avoids using too much sauce at once, since the 150ml bottle dispenses easily. Storing Pearl River Bridge Gluten Free Soy Sauce in the refrigerator preserves its freshness and aroma. He checks expiration dates regularly to ensure quality.
Common pitfalls and solutions:
-
Adding extra salt before tasting the finished dish
-
Using large amounts instead of adjusting gradually
-
Forgetting to store the sauce properly
-
Not involving family in taste tests
He found that patience and small adjustments led to better results. Consistent feedback from family members guided his approach and improved overall satisfaction.
He found that Reduced Salt Soy Sauce 150ml elevated his cooking while supporting his health goals. He recommends starting with small recipe changes and tasting as you go. He encourages readers to experiment with new flavors. This product helped him create meals that are both delicious and mindful.
FAQ
Is Reduced Salt Soy Sauce 150ml suitable for people with gluten intolerance?
Pearl River Bridge Gluten Free Soy Sauce uses gluten-free ingredients. It provides a safe option for individuals with gluten intolerance or celiac disease.
How should he store Reduced Salt Soy Sauce 150ml after opening?
He should refrigerate the bottle after opening. This practice preserves the aroma and maintains the quality of Gluten Free Low Sodium Soy Sauce.
Can he use Reduced Salt Soy Sauce 150ml in non-Asian recipes?
He can add Pearl River Bridge Gluten Free Soy Sauce to salad dressings, marinades, or dips. The sauce enhances both Asian and Western dishes with balanced umami flavor.
Sourcing bulk soy sauce for a new restaurant is one of those decisions that quietly shapes everything from your signature dishes to your food cost stability. Many first-time restaurant owners assume soy sauce is a simple commodity purchase, but once you start looking at different grades, fermentation methods, and regional styles, it becomes clear that not all soy sauces behave the same in a commercial kitchen. Choosing the right supplier is not just about price per liter—it’s about consistency, flavor balance, shelf stability, and how well the product fits your menu identity.
For many Asian restaurants, especially those building a menu around Chinese, Cantonese, or fusion cuisine, understanding the core soy sauce categories is the first step. Light soy sauce is typically used for seasoning, while darker varieties bring color, depth, and caramelized complexity to dishes. At the sourcing stage, it often helps to explore established commercial producers that already standardize flavor profiles for bulk supply. For example, a reliable reference point for restaurant-grade products can be found in offerings like Dark Soy Sauce, which is widely used in professional kitchens for braised dishes, marinades, and stir-fry bases. Products like this are designed not only for taste but also for consistency across large batch cooking, which is critical when your kitchen scales up during peak service hours.
Understanding what “bulk soy sauce” really means for restaurants
When suppliers talk about bulk soy sauce, they are usually referring to foodservice packaging—anything from 5-liter jugs to 20-liter drums, or even larger aseptic containers for central kitchens. But volume is only one part of the equation. Restaurants should also pay attention to fermentation method, ingredient quality, and sodium levels.
Naturally brewed soy sauce, for example, develops complexity over months of fermentation. Chemically hydrolyzed versions are faster and cheaper but often lack depth. In a restaurant environment, this difference becomes noticeable in dishes that rely heavily on seasoning rather than sauces—like fried rice, noodle bases, or dipping sauces.
Another overlooked factor is regional taste expectations. A Japanese-inspired restaurant might prioritize cleaner, lighter profiles, while a Chinese braised dish menu often depends on richer, darker soy sauces that can withstand long cooking times without turning bitter.
Where restaurants actually source soy sauce in bulk
Most restaurant owners don’t buy directly from retail shelves. Instead, they go through one of four main channels:
1. Foodservice distributors
Large distributors supply everything from ingredients to packaging. This is the most common route for restaurants that want predictable restocking schedules and credit terms. The downside is limited customization—what you get is usually what the distributor stocks.
2. Direct manufacturers
Working directly with soy sauce producers is ideal for restaurants that need consistent volume and branding control. This route often requires higher minimum order quantities but offers better pricing and customization options, including salt levels, color intensity, and packaging formats.
3. Importers and specialty Asian food suppliers
For restaurants outside Asia, importers play a key role in bringing authentic soy sauces into local markets. These suppliers often carry multiple brands, allowing chefs to test and compare different flavor profiles before committing.
4. Online B2B food platforms
Increasingly, restaurants are sourcing through B2B marketplaces that connect buyers with manufacturers globally. This option is especially useful for smaller restaurants that still want access to premium-grade ingredients without committing to massive bulk contracts.
Regardless of the channel, most chefs will test multiple samples before finalizing a supplier. In fact, tasting side-by-side comparisons is one of the most practical ways to evaluate whether a soy sauce works for your menu or not.
Key factors to evaluate before choosing a supplier
Once you start narrowing down suppliers, the decision becomes less about variety and more about performance under real kitchen conditions.
Flavor consistency is the first priority. In a busy kitchen, you cannot afford variation between batches. Even a slight shift in saltiness or sweetness can alter a signature dish.
Color stability is another important factor. Dark soy sauces are often used to enhance visual appeal in braised meats and stir-fries. If the color oxidizes or changes unpredictably after cooking, it can affect plating consistency.
Ingredient transparency is increasingly important, especially for restaurants positioning themselves as health-conscious or premium dining experiences. Clean-label soy sauces with minimal additives are becoming more in demand.
For example, restaurants looking for naturally brewed, cleaner-label options often explore products like Organic Soy Sauce, which appeal to modern diners who care about sourcing and ingredient integrity. These products are especially useful in upscale or health-oriented menus where customers are more attentive to what goes into their meals.
Matching soy sauce types with your menu strategy
Not all soy sauces serve the same purpose, and choosing the wrong type can subtly weaken your dishes.
Light soy sauce is typically used for seasoning and salt balance. It enhances flavor without overpowering the dish. Dark soy sauce, on the other hand, is more about body, color, and depth. It is commonly used in red-braised dishes, slow-cooked meats, and rich stir-fries.
Some restaurants also incorporate specialty variants to add signature notes. Mushroom-infused soy sauces, for instance, bring umami complexity that works well in vegetarian dishes or sauces that need an earthy undertone.
In fact, many chefs build a three-tier soy sauce system in their kitchen:
- A light soy sauce for seasoning
- A dark soy sauce for color and richness
- A specialty infused soy sauce for signature dishes
One example that fits into this specialty category is Mushroom Flavoured Dark Soy Sauce, which is often used to deepen umami while still maintaining the visual richness expected from dark soy-based dishes. It’s particularly effective in plant-based menus or modern fusion dishes where mushrooms are used as a core flavor foundation.
Cost control without sacrificing quality
For new restaurant owners, soy sauce might seem like a low-cost ingredient, but in high-volume kitchens it becomes a significant line item. The key is balancing cost efficiency with flavor integrity.
Buying in bulk almost always reduces unit cost, but it also introduces storage considerations. Soy sauce is stable, but once opened or transferred into smaller containers, it should be stored properly to avoid flavor degradation. Many restaurants invest in sealed dispensing systems to maintain quality over time.
Another strategy is blending. Some kitchens use a premium soy sauce for finishing dishes and a more cost-effective base soy sauce for cooking. This hybrid approach allows chefs to maintain flavor quality while controlling costs.
Storage, handling, and kitchen workflow
Proper storage is often overlooked but plays a major role in maintaining soy sauce quality. Bulk containers should be stored in cool, dry places away from direct sunlight. Once transferred into kitchen containers, they should be labeled clearly with batch dates to ensure rotation.
In busy kitchens, efficiency matters. Many restaurants set up centralized sauce stations where soy sauce is portioned into squeeze bottles or ladles for quick access during service. This reduces prep time and ensures consistent usage across different cooks.
Training staff is also important. Even high-quality soy sauce can be misused if chefs are not aligned on portion control and dish standards.
Building long-term supplier relationships
Once you find a soy sauce supplier that works for your restaurant, the relationship becomes part of your operational stability. Reliable suppliers often provide more than just products—they can offer formulation adjustments, private labeling, and even menu development support.
Over time, this consistency becomes part of your restaurant’s identity. Regular customers may not consciously recognize the soy sauce itself, but they will notice when flavors remain stable across visits.
As your restaurant grows, you may also expand into multiple soy sauce profiles to support seasonal menus or new dishes. At that stage, having a dependable supply chain becomes even more valuable than the initial cost savings.
A well-chosen soy sauce is not just an ingredient—it becomes part of the foundation of your cooking style, shaping how your dishes evolve and how customers remember your food.
- Buddha Jump Over the Wall1
- Canned Abalone2
- Canned Turtle Soup1
- Edible Bird's Nest2
- Frozen Foods1
- Frozen Seafood8
- Jelly/Pudding Applications1
- Meat Product Applications2
- Others Applications5
- Plant-based meat Product Applications1
- SURIMI2
- Soft Candy1
- Soft Candy Applications4
- bottle1
- can end2
- packaging film2
- tableware3